In a previous post, we looked at AWS App Runner. AWS App Runner is a container service that lets you focus on your application and allows you to deploy your application in minutes without setting up any infrastructure.
AWS App Runner supports two source options for your App Runner service:
- By pointing to a GitHub repository that contains your application source code
- From an existing container image stored in ECR (public or private is both possible)
The code-based source option only supports two languages at the moment: Node.js and Python. Your source also has to be stored on Github, but I expect AWS to add CodeCommit as a valid option pretty soon though. Now in my case, I would like to deploy a Java / Spring Boot-based application to AWS App Runner, so my best bet, for now, is to use a container image-based deployment. Now we could go for a pre-build image, but what’s the fun in that right? So in this post, we will take a look at a setup that you can leverage to deploy a Spring Boot-based application to AWS App Runner.
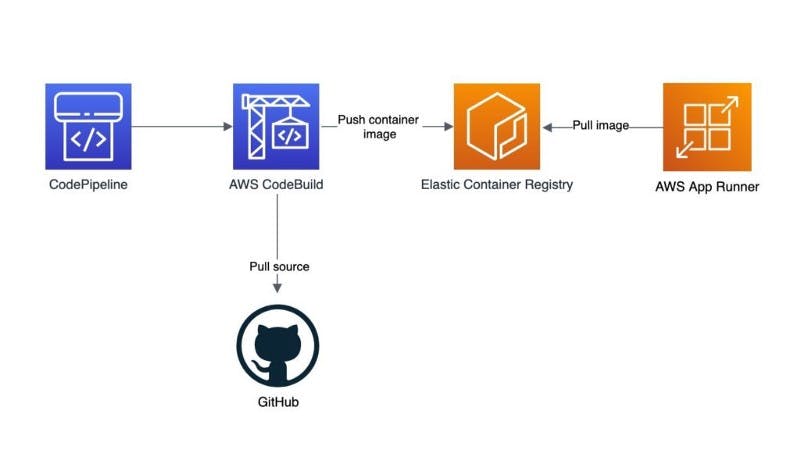
The overall setup
Our source code will be hosted in Github and we are leveraging CodePipeline + CodeBuild to build and test our Java application. If the build and test are successful we push the resulting container image to a private container registry in ECR. App Runner can then pick up the container image for deployment.

Now that we have a clear overall idea of what we need, let’s create the build and deployment stack with AWS CDK.
Setting up the basics
The first thing we will need is a private container image repository in ECR. This will allow us to store our container image and can be used later by App Runner to get our application as a container.
//ECR Repository
return Repository.Builder.create(this, "AppRunnerRepository")
                .imageScanOnPush(true)
                .imageTagMutability(TagMutability.MUTABLE)
                .removalPolicy(RemovalPolicy.DESTROY)
                .repositoryName("demo-quotes-service")
                .build();
With the image repository in place, we can continue with the next step, creating a CI pipeline for our project.
public ProjectBuildPipeline(Construct scope, String id, ProjectBuildPipelineProps props) {
        super(scope, id);

        PipelineProject springBootNativePipelineProject = PipelineProject.Builder.create(this, "SpringBootNativeProject")
                .environment(BuildEnvironment.builder()
                        // Use standard 4 because otherwise you seem to get a docker error
                        .buildImage(LinuxBuildImage.STANDARD_4_0)
                        // Spring Native is quite a heavy user for memory and CPU, so pick a large instance
                        .computeType(ComputeType.LARGE)
                        .privileged(true)
                        .build())
                // Build from the buildspec within the project
                .buildSpec(BuildSpec.fromSourceFilename("buildspec.yml"))
                .environmentVariables(
                        Map.of("REPOSITORY_URI",
                                BuildEnvironmentVariable.builder()
                                        .type(BuildEnvironmentVariableType.PLAINTEXT)
                                        .value(props.getRepository().getRepositoryUri())
                                        .build()))
                .cache(Cache.local(LocalCacheMode.DOCKER_LAYER))
                .build();

        Pipeline buildPipeline = Pipeline.Builder.create(this, "apprunner-pipeline-project").build();
        Artifact appSourceOutput = Artifact.artifact("APP_SOURCE");

        buildPipeline
                .addStage(
                        StageOptions.builder()
                                .stageName("Source")
                                .actions(List.of(
                                        CodeStarConnectionsSourceAction.Builder.create()
                                                .actionName("GitHubAppSource")
                                                .output(appSourceOutput)
                                                .owner("jreijn")
                                                .repo("sb-native-app-runner-demo")
                                                .branch("master")
                                                .connectionArn("arn:aws:codestar-connections:eu-west-1:123456789102:connection/e93cc05a-922c-4833-b963-6cd991bd7b12")
                                                .build()
                                ))
                                .build()
                );

        buildPipeline
                .addStage(StageOptions.builder()
                        .stageName("Build")
                        .actions(List.of(
                                CodeBuildAction.Builder.create()
                                        .actionName("Build")
                                        .project(springBootNativePipelineProject)
                                        .input(appSourceOutput)
                                        .build()
                        )).build());
}
The build pipeline makes sure that any code change will result in an update of our service. As you might have seen in the code snippet above we only build from the master branch, so any PR request, merge or commit to master will trigger a new build and will result in a new container image. In the App Runner service, which we will define later on, we can choose if we want App Runner to automatically deploy a new version of our application once it’s available. To instruct CodeBuild to build our maven based project and create a docker image out of that we can do so with a custom buildspec.yml file.
version: 0.2

phases:
  pre_build:
    commands:
      - echo Logging in to Amazon ECR...
      - aws --version
      - $(aws ecr get-login --region $AWS_DEFAULT_REGION --no-include-email)
      - COMMIT_HASH=$(echo $CODEBUILD_RESOLVED_SOURCE_VERSION | cut -c 1-7)
      - IMAGE_TAG=${COMMIT_HASH:=latest}
  build:
    commands:
      - echo Running maven build
      - ./mvnw -pl app package
      - echo Building the Docker image...
      - ./mvnw -pl app spring-boot:build-image -Dspring-boot.build-image.imageName=$REPOSITORY_URI:latest
      - docker tag $REPOSITORY_URI:latest $REPOSITORY_URI:$IMAGE_TAG
  post_build:
    commands:
      - echo Build completed on `date`
      - echo Pushing the Docker images...
      - docker push $REPOSITORY_URI:latest
      - docker push $REPOSITORY_URI:$IMAGE_TAG
As you can see we’ve split the build into 3 separate phases:
- We log into ECR and we create a hash for the image tag that we will create later on.
- We build the maven project and leverage the Spring Native maven plugin to create a native image. For tagging with the correct container registry, we inject the repository location as an environment variable into our build process. As a final step, we tag the created docker image.
- We push the docker image to our ECR repository.
To make sure the App Runner service can fetch the docker image from our ECR repository, we will need to create and assign a role that has the permissions to do so.
Role.Builder.create(this, "AppRunnerECRRepositoryRole")
        .assumedBy(new ServicePrincipal("build.apprunner.amazonaws.com", ServicePrincipalOpts.builder().build()))
        .managedPolicies(
                List.of(
                        ManagedPolicy.fromManagedPolicyArn(
                                this,
                                "AWSAppRunnerServicePolicyForECRAccessPolicy",
                                "arn:aws:iam::aws:policy/service-role/AWSAppRunnerServicePolicyForECRAccess"
                        )
                )
        )
        .build();
Creating the App Runner service
Now for the last and final part of our setup, we will need to create the AWS App Runner service via CDK.
public ECRBasedAppRunnerService(Construct scope, String id, Role role) {
        super(scope, id);

        CfnService.HealthCheckConfigurationProperty healthCheckConfigurationProperty =
                new CfnService.HealthCheckConfigurationProperty.Builder()
                        .path("/actuator/health")
                        .protocol("HTTP")
                        .interval(10)
                        .timeout(5)
                        .healthyThreshold(5)
                        .unhealthyThreshold(1)
                        .build();

        CfnService.AuthenticationConfigurationProperty authenticationConfigurationProperty =
                CfnService.AuthenticationConfigurationProperty.builder().accessRoleArn(role.getRoleArn()).build();

        CfnService.ImageRepositoryProperty imageRepositoryProperty = CfnService.ImageRepositoryProperty.builder()
                .imageIdentifier("1234567890.dkr.ecr.eu-west-1.amazonaws.com/demo-quotes-service:latest")
                .imageConfiguration(CfnService.ImageConfigurationProperty.builder()
                        .port("8080")
                        .build())
                .imageRepositoryType("ECR")
                .build();

        CfnService.SourceConfigurationProperty sourceConfigurationProperty = CfnService.SourceConfigurationProperty.builder()
                .imageRepository(imageRepositoryProperty)
                .authenticationConfiguration(authenticationConfigurationProperty)
                .autoDeploymentsEnabled(true)
                .build();

        CfnService cfnService = CfnService.Builder.create(this, "AppRunnerService")
                .serviceName("demo-quotes-service")
                .instanceConfiguration(CfnService.InstanceConfigurationProperty.builder()
                        .cpu("1 vCPU")
                        .memory("2 GB")
                        .build())
                .sourceConfiguration(sourceConfigurationProperty)
                .healthCheckConfiguration(healthCheckConfigurationProperty)
                .build();
If we look at the above code snippet, we’ve set up five configuration options for App Runner:
- The health check endpoint.
- The role required to access the image in ECR
- The image source and the Port that our container will listen on
- The service name
- The type of resources (memory/CPU) required to run our service
Now we have all the code we need for CDK to create the entire stack and create the service for us. It’s just a matter of running cdk deploy and you will have the entire stack up and running.
CfnOutput.Builder.create(this, "serviceUrl").value("https://" + cfnService.getServiceUrl()).build();
If we want to know the URL of our new service, we can leverage a CDK CnfOutput construct in which you can request the URL of the service and it will be printed out once the stack is finished deploying.
When CDK is done with the deployment you will be able to find the URL to your service in the output of the CDK deploy.
Do you wish to deploy these changes (y/n)? y
apprunner-runtime-stack: deploying…
apprunner-runtime-stack: creating CloudFormation changeset…
✅ apprunner-runtime-stack
Outputs: apprunner-runtime-stack.serviceUrl = someid.eu-west-1.awsapprunner.com
Summary
Even if you’re not using a language supported by AWS App Runner, it’s still pretty straightforward to deploy your service to AWS App Runner. You can simply use your existing pipeline or create a new build pipeline in AWS CodePipeline that will result in an image in ECR, from which App Runner can do the rest. For this service, I’ve chosen to use Spring Native. Spring Native will create a native image for your Spring Boot application, which results in a much faster application startup. In my case, for a simple application, the time it takes for the application to start is about 500ms instead of 3 seconds (non-native image). When you expect your application to retrieve traffic spikes that might trigger App Runner to scale out, this improvement can help for sure.
Originally published at jeroenreijn.com.
