Over the last 2.5 years, I’ve been working with AWS and a wide range of its services. During this time I noticed that for most projects it’s useful to be able to test your application against AWS services without having to deploy or move your code into the cloud. There are several free solutions available for you to use depending on the services required by your project. In this post, I’ll describe some of the tools that I use.
DynamoDB local
 At one of my previous projects, we made extensive use of the combination of DynamoDB and Elasticsearch for storing and querying data. The fact that DynamoDB is a managed database service with immense scale and performance benefits, makes DynamoDB a great fit for high traffic applications.
As a user, it’s quite simple to use as it’s a key-value store. Most of the other AWS databases are managed instances of existing services, however, DynamoDB is an AWS specific service which you can’t really download and install locally. Luckily back in 2018 AWS introduced a simpler way to work with DynamoDB utilizing DynamoDB local, a dockerized version of DynamoDB which you can simply run as a docker container to develop and test against.
Running DynamoDB local is as simple as executing:
$ docker run -p 8000:8000 amazon/dynamodb-local
Or if it’s part of a bigger set of dependencies you could leverage docker-compose.
version: '3'

services:
  dynamodb:
    image: amazon/dynamodb-local:latest
    hostname: dynamodb-local
    ports:
      - "8000:8000"
With that it’s a matter of running:
$ docker-compose up
And you should see something like:
Starting dynamodb_dynamodb_1 ... **done
**Attaching to dynamodb_dynamodb_1
dynamodb_1  | Initializing DynamoDB Local with the following configuration:
dynamodb_1  | Port:     8000
dynamodb_1  | InMemory: true
dynamodb_1  | DbPath:   null
dynamodb_1  | SharedDb: false
dynamodb_1  | shouldDelayTransientStatuses:     false
dynamodb_1  | CorsParams:       *****
With the AWS CLI you can easily query for available tables:
$ aws dynamodb list-tables --endpoint-url http://localhost:8000
Which should result in something like:
{
    "TableNames": []
}
And of course, you can use the AWS SDK with your preferred language as well.
I hear you thinking: are there no limitations? Yes of course there are some limitations with using DynamoDB local compared to the managed service. For instance, parallel scans are not supported (they will happen sequentially). Most limitations are nicely outlined in the DynamoDB Developer guide.
Amazon also provides docker images for other services as well like AWS Step functions Local and OpenDistro for Elasticsearch. Be sure to check out the Amazon repo on DockerHub for other usefull images.
LocalStack
Now when you’re developing a simple service that only depends on DynamoDB, DynamoDB local is a good choice. However, once you start to leverage more and more services it might be worthwhile to look for other options as not all services are available as single docker images.
When you’re building services that are part of a microservices architecture, you’re probably using other AWS services like SNS, SQS, and perhaps S3. This is where a tool like LocalStack can add a lot of value. So what is LocalStack?
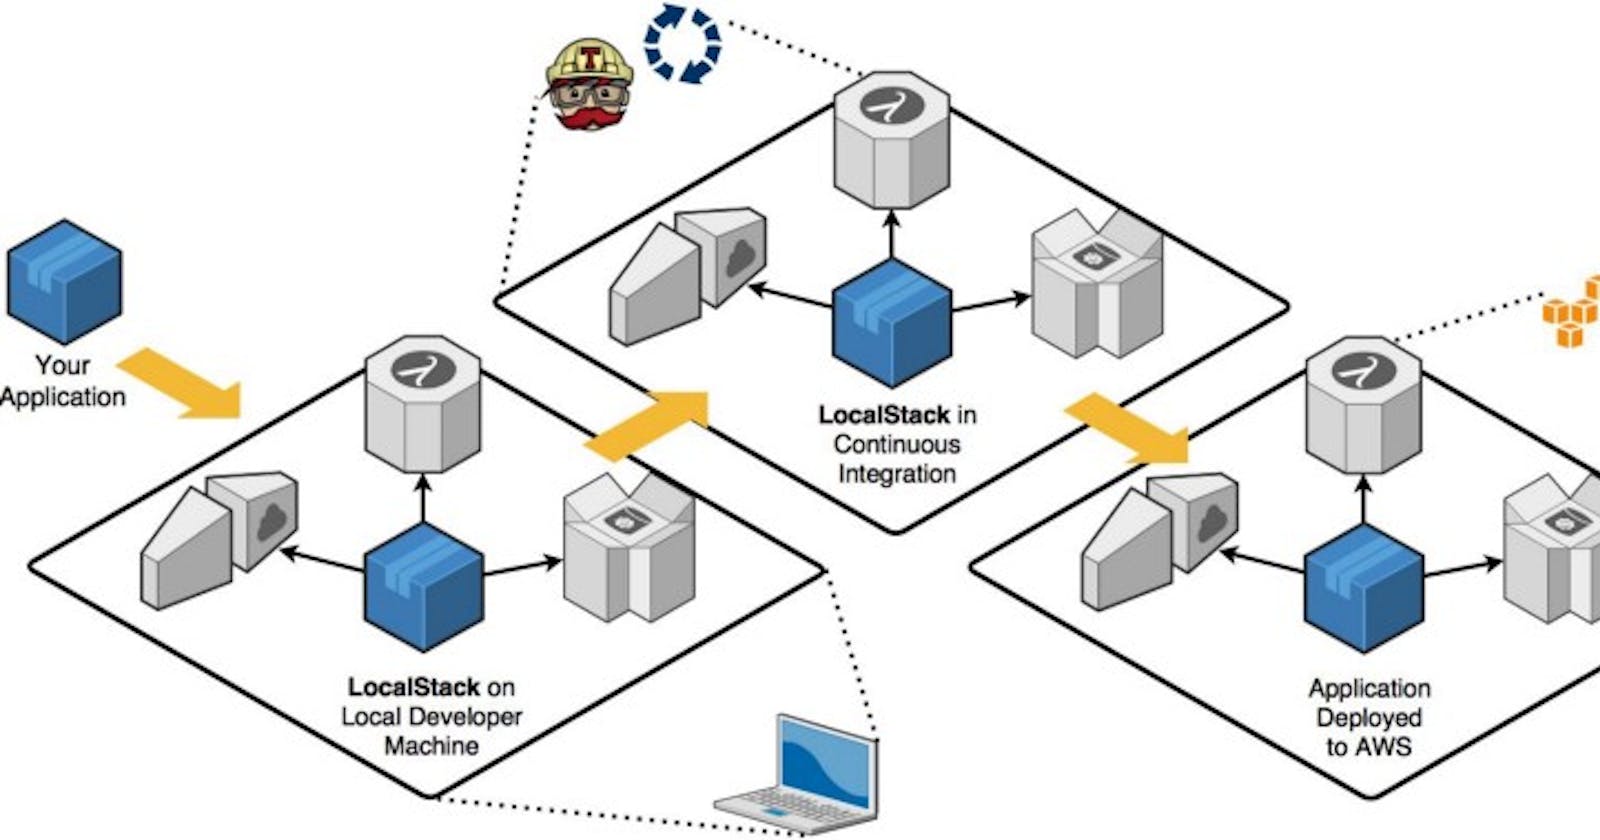
LocalStack is a project open-sourced by Atlassian that provides an easy way to develop AWS cloud applications directly from your localhost. It spins up a testing environment on your local machine that provides almost the same feature parity and APIs as the real AWS cloud environment, minus the scaling and robustness of course.
Localstack focuses primarily on providing a local AWS cloud environment that adheres to the AWS APIs and offers a free and pro version, which you can leverage depending on your requirements. In my experience, the free/community version offers a lot of value and supports a whole range of services.
You can install LocalStack via pip if you're familiar with python and its package system or you can use it via docker(compose). On my Mac, I found that installing LocalStack as a python package was a bit of a hassle, so I always prefer to use it via docker-compose.
Using LocalStack with docker-compose is as simple as creating a docker-compose.yml file with the content:
version: '3'

services:
  localstack:
    image: localstack/localstack:0.12.2
    ports:
      - "4566-4599:4566-4599"
      - "${PORT_WEB_UI-8080}:${PORT_WEB_UI-8080}"
    environment:
      - SERVICES=${SERVICES- }
      - DEBUG=${DEBUG- }
      - DATA_DIR=${DATA_DIR- }
      - PORT_WEB_UI=${PORT_WEB_UI- }
      - LAMBDA_EXECUTOR=${LAMBDA_EXECUTOR- }
      - KINESIS_ERROR_PROBABILITY=${KINESIS_ERROR_PROBABILITY- }
      - DOCKER_HOST=unix:///var/run/docker.sock
      - HOST_TMP_FOLDER=${TMPDIR}
    volumes:
      - "${TMPDIR:-/tmp/localstack}:/tmp/localstack"
      - "/var/run/docker.sock:/var/run/docker.sock"
If you’re running on a Mac be sure to prepend TMPDIR=/private$TMPDIR before running.
$ TMPDIR**=**/private$TMPDIR docker-compose up
Afterwards, you should see something similar to the following output.
Recreating localstack_localstack_1 ... **done
**Attaching to localstack_localstack_1
localstack_1  | Waiting **for** all LocalStack services to be ready
localstack_1  | 2020-12-03 20:45:34,940 CRIT Supervisor is running as root.  Privileges were not dropped because no user is specified **in** the config file.  If you intend to run as root, you can set user**=**root **in** the config file to avoid this message.
localstack_1  | 2020-12-03 20:45:34,943 INFO supervisord started with pid 13
localstack_1  | 2020-12-03 20:45:35,951 INFO spawned: 'dashboard' with pid 19
localstack_1  | 2020-12-03 20:45:35,953 INFO spawned: 'infra' with pid 20
localstack_1  | 2020-12-03 20:45:35,958 INFO success: dashboard entered RUNNING state, process has stayed up **for** **>** than 0 seconds **(**startsecs**)**
localstack_1  | 2020-12-03 20:45:35,958 INFO exited: dashboard **(**exit status 0; expected**)**
localstack_1  | **(**. .venv/bin/activate; exec bin/localstack start --host**)**
localstack_1  | Starting local dev environment. CTRL-C to quit.
localstack_1  | LocalStack version: 0.12.2
localstack_1  | 2020-12-03 20:45:37,470 INFO success: infra entered RUNNING state, process has stayed up **for** **>** than 1 seconds **(**startsecs**)**
localstack_1  | Waiting **for** all LocalStack services to be ready
localstack_1  | Starting edge router **(**https port 4566**)**...
localstack_1  | Starting mock ACM service on http port 4566 ...
localstack_1  | Starting mock API Gateway service on http port 4566 ...
localstack_1  | Starting mock CloudFormation service on http port 4566 ...
localstack_1  | Starting mock CloudWatch service on http port 4566 ...
localstack_1  | Starting mock DynamoDB service on http port 4566 ...
localstack_1  | Starting mock DynamoDB Streams service on http port 4566 ...
localstack_1  | Starting mock EC2 service on http port 4566 ...
localstack_1  | Starting mock ES service on http port 4566 ...
localstack_1  | Starting mock Firehose service on http port 4566 ...
localstack_1  | Starting mock IAM service on http port 4566 ...
localstack_1  | Starting mock STS service on http port 4566 ...
localstack_1  | Starting mock Kinesis service on http port 4566 ...
localstack_1  | Starting mock KMS service on http port 4566 ...
localstack_1  | **[**2020-12-03 20:45:43 +0000] **[**21] **[**INFO] Running on http://0.0.0.0:47689 **(**CTRL + C to quit**)**
localstack_1  | 2020-12-03T20:45:43:INFO:hypercorn.error: Running on http://0.0.0.0:47689 **(**CTRL + C to quit**)**
localstack_1  | **[**2020-12-03 20:45:43 +0000] **[**21] **[**INFO] Running on https://0.0.0.0:4566 **(**CTRL + C to quit**)**
localstack_1  | 2020-12-03T20:45:43:INFO:hypercorn.error: Running on https://0.0.0.0:4566 **(**CTRL + C to quit**)**
localstack_1  | Starting mock Lambda service on http port 4566 ...
localstack_1  | Starting mock CloudWatch Logs service on http port 4566 ...
localstack_1  | Starting mock Redshift service on http port 4566 ...
localstack_1  | Starting mock Route53 service on http port 4566 ...
localstack_1  | Starting mock S3 service on http port 4566 ...
localstack_1  | Starting mock Secrets Manager service on http port 4566 ...
localstack_1  | Starting mock SES service on http port 4566 ...
localstack_1  | Starting mock SNS service on http port 4566 ...
localstack_1  | Starting mock SQS service on http port 4566 ...
localstack_1  | Starting mock SSM service on http port 4566 ...
localstack_1  | Starting mock Cloudwatch Events service on http port 4566 ...
localstack_1  | Starting mock StepFunctions service on http port 4566 ...
localstack_1  | Waiting **for** all LocalStack services to be ready
localstack_1  | Ready.
As you can see, it starts a whole bunch of services out of the box. If you don’t use all those services you can also provide a list of services required when starting localstack by providing a SERVICES variable like:
$ TMPDIR**=**/private$TMPDIR SERVICES**=**s3,sqs docker-compose up
Now you should see in the startup output that it only started S3 and SQS.
Recreating localstack_localstack_1 ... **done
**Attaching to localstack_localstack_1
localstack_1  | Waiting **for** all LocalStack services to be ready
localstack_1  | 2020-12-03 20:58:06,180 CRIT Supervisor is running as root.  Privileges were not dropped because no user is specified **in** the config file.  If you intend to run as root, you can set user**=**root **in** the config file to avoid this message.
localstack_1  | 2020-12-03 20:58:06,183 INFO supervisord started with pid 13
localstack_1  | 2020-12-03 20:58:07,187 INFO spawned: 'dashboard' with pid 19
localstack_1  | 2020-12-03 20:58:07,191 INFO spawned: 'infra' with pid 20
localstack_1  | 2020-12-03 20:58:07,195 INFO success: dashboard entered RUNNING state, process has stayed up **for** **>** than 0 seconds **(**startsecs**)**
localstack_1  | 2020-12-03 20:58:07,195 INFO exited: dashboard **(**exit status 0; expected**)**
localstack_1  | **(**. .venv/bin/activate; exec bin/localstack start --host**)**
localstack_1  | Starting local dev environment. CTRL-C to quit.
localstack_1  | LocalStack version: 0.12.2
localstack_1  | 2020-12-03 20:58:08,856 INFO success: infra entered RUNNING state, process has stayed up **for** **>** than 1 seconds **(**startsecs**)**
localstack_1  | Waiting **for** all LocalStack services to be ready
localstack_1  | Starting edge router **(**https port 4566**)**...
localstack_1  | Starting mock S3 service on http port 4566 ...
localstack_1  | **[**2020-12-03 20:58:12 +0000] **[**21] **[**INFO] Running on http://0.0.0.0:55251 **(**CTRL + C to quit**)**
localstack_1  | 2020-12-03T20:58:12:INFO:hypercorn.error: Running on http://0.0.0.0:55251 **(**CTRL + C to quit**)**
localstack_1  | **[**2020-12-03 20:58:13 +0000] **[**21] **[**INFO] Running on https://0.0.0.0:4566 **(**CTRL + C to quit**)**
localstack_1  | 2020-12-03T20:58:13:INFO:hypercorn.error: Running on https://0.0.0.0:4566 **(**CTRL + C to quit**)**
localstack_1  | Starting mock SQS service on http port 4566 ...
localstack_1  | Waiting **for** all LocalStack services to be ready
localstack_1  | Ready.
Update: I just learned that homebrew also supports installing LocalStack. I’ve not used it, so can’t say if it’s any good, but it looks pretty simple :-)
$ brew install localstack
If you don’t want to manually start LocalStack via docker-compose, but want to start it for instance during your build/test phase, you can also leverage testcontainers and just add a localstack rule to your Unit test:
DockerImageName localstackImage = DockerImageName.parse("localstack/localstack:0.11.3");

@Rule
public LocalStackContainer localstack = new LocalStackContainer(localstackImage)
        .withServices(S3);
AWSLocal
If you’re already using LocalStack, it’s worthwhile to also install awslocal. It's a CLI that proxies the AWS CLI and adds the --endpoint-url http://localhost:4566/ after every command, so you don't have to.
You can install it by running
$ pip install awscli-local
Commandeer
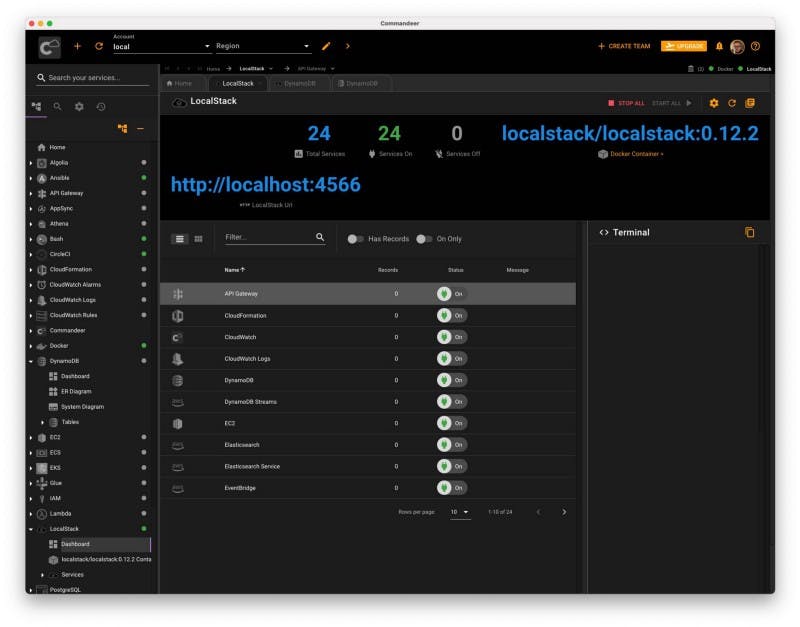
Localstack used to come with a Web UI, which is now marked as deprecated. As an alternative, I would recommend using Commandeer. It’s a very useful tool and also supports working with LocalStack (next to a whole bunch of other services). It can give a nice overview of the services started with localstack, but also offers dashboards and UIs for example DynamoDB in which you can explore data, create tables, etc.

If you know of other useful tools that help you in your day to day work working with and developing on the AWS platform, feel free to leave a comment!
Originally published at jeroenreijn.com on December 3, 2020.
